
Table of Contents
These are notes of different scripts, settings, tweaks and other stuff I’ve found to help make using the REAPER DAW a bit smoother as I’ve been trying to switch to it from Cubase.#
Multi tool#
A script made by Julian Sader. This script adds most of the same midi value manipulation that Cubase has out of the box + it also works in the arrangement view, so you can use it there for automation as well!
https://forums.cockos.com/showthread.php?p=2211574
Seventh Sam’s blog guides#
From those blog posts, I found out how to make a button for toggling multi track editing on/off in the MIDI Editor, which has also saved me a lot of head ache. I also found out about the Multi Tool script from there. Seems like he has some new guides on a script to set up CC lane preset buttons to the bottom of the MIDI editor which I think I’ll also have use for.
https://seventhsam.com/blogs/tutorials/posts/6791049/how-to-set-up-reaper-s-midi
Gridbox#
Binding the action to change the grid sizes is also handy, I did that in cubase too (1/4, 1/8, etc), but there is a user made script/tool by FeedTheCat to dynamically change the grid size based on zoom level thats great too.
https://forum.cockos.com/showthread.php?t=260388
Articulation Scripts#
Probably the one thing that helped me the most on switching to reaper, specifically in regards to working with orchestral/sampled sounds, was the new Articulation System by Jesper Ankarfeldt, in Cubase I had set up expression maps with negative track delays per articulation for all my sounds in , since that was finally a function in the newer updates before switching to REAPER, and this script also makes it possible to have per articulation delay values as too!
https://forum.cockos.com/showthread.php?t=306590
NVK TOOLS#
One script I like a lot is nvk_SEARCH, which adds a handy search window that you can use to pretty much quickly search anything in your project, be it actions, track, trackpresets etc. They make some other sound design focused scripts too that are iirc heavily used and recommended by game audio people, but I haven’t done much sound design so cant say much about them.
https://store.nvk.tools/l/nvk_SEARCH
Disable/Enable Tracks and Hide/Show them#
This is a handy script to get the track disabling/enabling functionality that Cubase had that I used constantly on my orchestral template to turn off tracks not in use to keep the ram footprint down.
https://forums.cockos.com/showthread.php?p=2203958
And pairing that with custom scripts that hide and show those disabled tracks, helps keep the project not looking too cluttered. I have bound the hide and show scripts to shift + Q and shift + W respectively myself.
https://forum.cockos.com/showpost.php?p=2651508&postcount=4
Themes#
The default reaper theme is OK, but I really don’t like some parts of it and really like to have the arrangement view and key editor backgrouds as gray/white and the stock theme has them as pretty dark, much like cubase has out of the box.
Since I don’t want to start tweaking the theme myself, I found this slick looking theme by Alejandro Hernandez aka Reapertips which had different light/dark/hybrid versions that had the exact colors I wanted!
https://forum.cockos.com/showthread.php?p=2701211
Delay Compensation#
Cubase has a feature called Constrain Delay Compensation that I used a lot when recording stuff, it disables all effect plugins that add delay when recording is enabled on a track(s).
Luckily there was a similar feature in REAPER too, but it doesn’t have a button on the UI for it out of the box.
The script that toggles it on and off is called FX: Toggle preference: Auto-bypass FX that require PDC on record arm-affected tracks and you can also find the option for it in the REAPER settings inside the main Audio category.
I attached that script to a button and now I can toggle it on/off when I want to record in the lowest latency possible.
Enlarge Selected Track(s)#
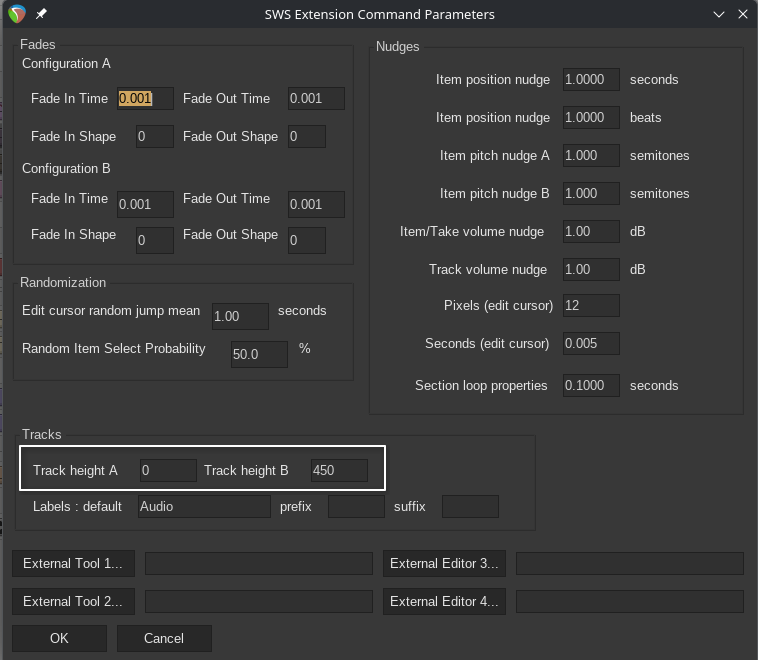
For having the Enlarge Selected Tracks via a hotkey feature from Cubase, there are two actions from the SWS extension addon to Reaper that can be used to recreate it, called Xenakios/SWS: Set selected tracks heights to A and Xenakios/SWS: Set selected tracks heights to B respectively. You set the height values for the A and B inside the Extensions>SWS/S&M>Command Parameters menu, I used 450 for B to get it to a nice size for editing audio and then 0 for A to set it to the smallest height since that’s what I keep tracks on by default.
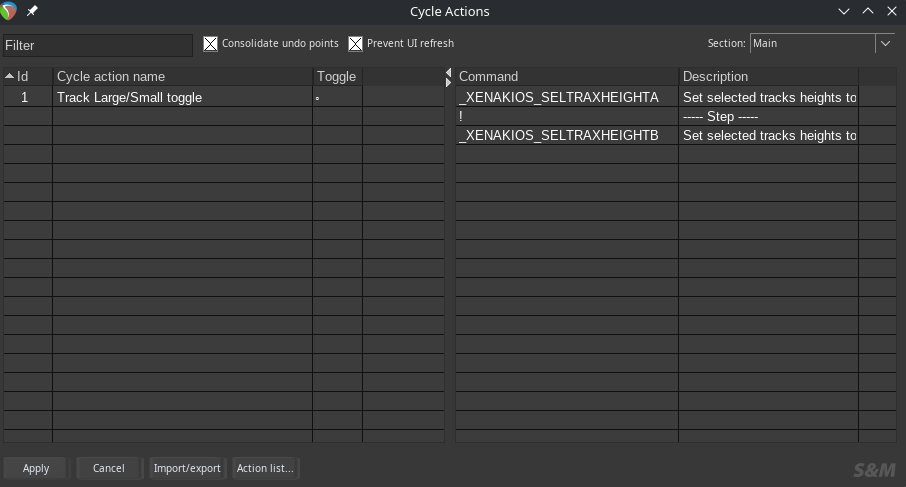
To then make the actual Action that you can then bind to a key, you need to make whats called a Cycle Action using the provided tool from the SWS extensions, found under Extensions>SWS/S&M>Cycle Action editor and make the action there, hopefully the image shows how it’s setup.
On the left you right click to add the cycle action and on the right side you right click to add the Xenakios/SWS: Set selected tracks heights to A and Xenakios/SWS: Set selected tracks heights to B actions with a —Step—- between them that then cycles between those actions when you trigger this new cycle action.
You can name it what you want and it will show up in the Actions menu with that name.
Do have the actions window open with the 2 Xenakios/SWS: Set selected tracks heights to X actions ready beside the Control Parameters window, since you need to have those actions selected in the actions window to be able to insert them inside the Control Parameters window via the right click menu!
After making the Cycle Action and binding it to a key, it should switch the sizes of selected tracks between the 2 values you specified. This makes editing audio a lot faster and easier by having a large track height with a click of a key and I was really used to this in Cubase where it was a default feature bound under the Z key (cant remember if it was by default there or I bound it myself) 😄
There are no articles to list here yet.